1/2 cup peanut butter
3 Tbls. butter, softened
1 cup powdered sugar
8 oz. dipping chocolate
Use semi-sweet chocolate squares.
Chill mixture before dipping in chocolate.
Usually double the batch to get 25 balls.
**increase peanut butter by 1/4 cup for less sugary balls.
Wednesday, December 29, 2010
Thursday, February 25, 2010
Simple Side: Grilled Haricot Vert Packets
Ingredients
fresh french style green beans
1 lemon
butter
salt and pepper
Tear off equally sized pieces of foil for the number of people you have eating
Place a serving of clean green beans in the center of the foil
Squeeze a little lemon juice over them
Cut a pat of butter and place over the beans
Add salt and pepper to your liking

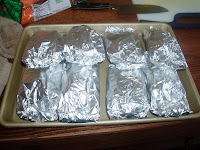
 To make the foil packet bring up the two long sides of foil and fold/roll down making a center seam, then roll the ends up to keep the butter from dripping out, once melted.
fresh french style green beans
1 lemon
butter
salt and pepper
Tear off equally sized pieces of foil for the number of people you have eating
Place a serving of clean green beans in the center of the foil
Squeeze a little lemon juice over them
Cut a pat of butter and place over the beans
Add salt and pepper to your liking

 To make the foil packet bring up the two long sides of foil and fold/roll down making a center seam, then roll the ends up to keep the butter from dripping out, once melted.
Depending upon how crisp or tender you like your beans, I suggest allowing 10-15 minutes of cook time. Throw them on the top rack of the grill to cook.
Even though the ingredients here are simple the end result is freshly grilled haricot vert that has a nutty undertone.
The beauty of these little packets is that everyone can easily grab one and throw their own foil away, leaving you with no clean up and more time to enjoy the deliciously warm sunny day. Sunday, January 17, 2010
Banana Pancakes
Wet Ingredients
3 ripe bananas - even slightly over-ripe bananas work really well
2 eggs
2 tbls butter
4 tbls butter milk - I usually use skim milk and it works just as well, if you are trying to save calories
1 tbls honey
Dry Ingredients
1 cup all purpose flour
1/2 tsp baking soda
1/2 tsp cinnamon
1/4 tsp nutmeg
1/2 tsp pumpkin pie spice

In a small mixing bowl combine wet ingredients. Mash up the bananas, melt the butter and add to the bananas, then add the honey, milk, and eggs (one at the time, mixing after each).
In a medium mixing bowl combine dry ingredients. Then make a slight well in in the center of the flour mixture and pour in the wet mixture. Mix until all the flour is combined. Be careful not to over-mix.
Pour 1/4 cups full of the batter onto the hot griddle. Once the edges look slightly dry and there are bubbles, it is time to flip the pancakes. About 1 minute per side.
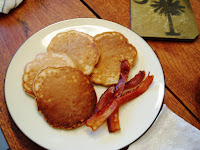
Makes approximately 8 medium sized pancakes. Serve with real Maple Syrup, or eat plain with a few slices of fresh banana or your favorite fresh fruit.
Labels:
Banana,
Banana Pancakes,
Breakfast,
Pancakes,
Syrup
Tuesday, January 12, 2010
The Southern Flavor of an Iron Skillet
"Can't no Teflon fry no fried chicken." -Vertamae Grosvenor
Revered as heirlooms, passed down from generation to generation, cast iron pans are the essential kitchen tool for true Southern Cooking. There isn't much a southern girl can't cook in her Mama's well seasoned skillet, from fried chicken to cornbread, it is a tangible piece of a family's history.
Seasoning your iron skillet takes time - years, in fact - that's why it is such a valued possession. Building up layers of natural oils over time creates a non-stick surface, while enriching the food with a uniquely "southern" flavor. The more you use, or season, your skillet the darker the color of the skillet will become over time. There are a few rules of care that must be following to hold up the integrity of a well-seasoned skillet. If these techniques are followed there is no reason why your cast iron skillets won't last through your lifetime, and many generations beyond.
 Never, ever, ever clean your iron skillet with soap or a scouring pad, or worse, put it in the dishwasher. This breaks down all the seasoning you've worked so hard to build up. All you need to do is rinse the pan out with hot water, gently brushing out any food, then dry it thoroughly with paper towels.
Store you iron skillet in a cool, dry place to prevent rust. If your skillet has a lid store it seperately, or place a paper towel between the pan and the lid to absorb any moisture.
If you are lucky enough to have inherited an iron skillet, preserve it and care for it well. If you are learning to cook like a southerner, go get yourself a medium iron skillet tomorrow!
Don't be discouraged by a new, unseasoned pan. You can easily be on your way to having a well-seasoned skillet in no time. The best seasoning food you can cook in your new pan is bacon. After cooking the bacon drain the grease into a container and keep it in the refrigerator until it solidifies.
Seasoning an Iron Skillet
Heat your oven to 250 degrees
Coat the inside of your skillet with a layer of the bacon grease (lard can also be used)
Place the pan in the oven for 15 minutes. Pour any excess grease out of the pan, and put it back in the oven for another 2 hours.
This process can be repeated several times to enhance seasoning.
Another important advantage of cooking in cast iron is that it is one of the top sources for achieving your daily iron intake. Getting proper amounts of iron are essential for preventing anemia and fatigue.
Labels:
Cast Iron Pan,
Frying,
Seasoning,
Skillets
Monday, January 11, 2010
Honey Roasted Sweet Potatoes
2 Large Sweet Potatoes
1/8 cup Olive Oil*
1/8 cup Honey
1 Tsp. Cinnamon**
Sprinkling of Nutmeg
Salt and Pepper
Pre-heat oven to 375 degrees
Peel and chop potatoes into 1 inch cubes
Place in one layer on a baking sheet
Drizzle with olive oil, honey, and cinnamon, salt and pepper
Mix to get all the potatoes coated
Bake for 25-30 minutes
* **Author's Note:
*Tip: Measure the oil first, then use the same measuring cup to measure the honey. The thin coat of oil left in the cup will allow the honey to slide right out onto the potatoes, not wasting a drop and preventing a sticky mess for clean up.
**I used half a teaspoon of cinnamon and half a teaspoon of pumpkin pie spice, but one teaspoon of cinnamon and a sprinkling of nutmeg will do just fine too.
Thursday, January 7, 2010
Simple Supper: Blackened Mahi and Grits
Grits
Use real stone ground grits, Quaker Instant or Quick Cooking grits will not work. If you have never tried stone ground grits the texture is very different from "breakfast" grits. So, no cheating.
Southern Wisdom: Grits are eaten with butter, cheese, or gravy - never sugar
2/3 cups yellow stone ground grits
1 cup water
1 cup broth or stock - can be chicken, beef, whatever you have on hand. this gives the grits another element of flavor
1 Tbs. butter
salt and pepper
Put grits, water, and stock in a medium pot and bring to a boil. Then turn the heat to low and cook uncovered for 25-30 minutes. Stir occasionally.
In the last few minutes throw the butter in and salt and pepper to taste.
While the grits are cooking prepare your mahi.
Mahi
Preheat oven to 400 degrees
take fresh or thawed mahi already cleaned, skinned, and ready for prep
place the fish in a small baking dish drizzle with olive oil and your favorite Blackened Seasoning. We used Zatarans.
Bake in the oven for about 15 minutes, depending on how thick your pieces of mahi are. Cooked, it should be white and flake with a fork.
Serve the mahi over the the grits and drizzle any remaining oil from the baking dish over the top - don't throw it away!
.
Monday, January 4, 2010
Meatloaf

Preheat oven to 400 degrees.
1 lb. 90/10 ground beef
1 8oz. can tomato sauce
1/2 onion (can be sweet yellow or white)
1/2 green bell pepper *
Few dashes Wochestershire Sauce
1 Egg
Salt and Pepper
Put groud beef in a medium mixing bowl. Add all other ingredients, then with your hands mix together well, but not too much. If you mix too much it will make the meatloaf tough. Transfer mixture into an 8x8 casserole dish and spread out to the form of the dish. A 9x13 works too, just mold the mixture into a loaf shape. Cover with foil and bake for about 20 minutes. After that time remove the foil and finish baking for 15-20 more minutes, as needed.
You can add other things to the meatloaf mix as you like. Sometimes I add hotsauce, chili powder, or garlic.
We had this for dinner last night with boiled red potatoes and fried okra.
Subscribe to:
Comments (Atom)


